It is possible to lay brick over concrete, but the concrete surface must be structurally sound and free of any major cracks or other damage that could interfere with adhesion. It also must be thoroughly cleaned before laying bricks.
The basic tools of the trade include pointed trowels and bolster chisels. A spirit level and a club hammer are also required. Visit https://www.bricklayerperthwa.com.au/ to learn more.
Brick laying is the process of adhering thin bricks to concrete, to create an attractive wall or patio. Usually this is done on existing concrete structures that are looking outdated or need some updating. The first step is to clean the concrete surface thoroughly. This will ensure the bond between the concrete and the brick is strong. The bricks are usually laid in a course, so it is important to make sure that the surface of each course is flat and smooth. This can be achieved by using a hand trowel.
Once the surface is ready it is time to start preparing the mortar. You can mix it by hand or in a wheelbarrow, or even in a cement mixer. A good mix is three parts masonry sand (builders sand works well, if it is very clean) to one part masonry cement. This should be mixed well to a consistency similar to pudding. It is important not to rush this stage as a badly prepared mortar will cause problems later on, and can be very time consuming to fix.
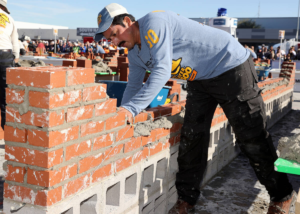
When you are happy with the consistency of the mortar it is time to begin laying bricks. Always start at the bottom of a wall and work upwards, making sure each course is level. This is especially important when you are working on a curve as this will require you to pay particular attention to the alignment of each course. Throughout the whole process it is good to use a spirit level regularly to check that your work is as straight as possible, this will ensure that when you come back to it after a break everything will be in line again.
After the first course is complete, it is a good idea to drive a wooden stake into each end of the wall, this will help you to determine how high each future course should be. This is also a great way to find out how long the walls will be as you can measure the distance between the stakes. Once this has been determined you can start the next course, remembering to check that each brick is flush with the previous.
Bricklaying is a great profession for those who like to work with their hands and enjoy working outdoors. This type of construction also requires a lot of attention to detail and can be very rewarding. A bricklayer earns a good salary and benefits in addition to the satisfaction that comes with doing the job well. However, it is important to note that there are several steps involved in this trade and that proper preparation is essential for success.
One of the most important aspects of laying brick is to prepare the foundation. If the foundation is not properly prepared, it can cause problems with the longevity and strength of the finished product. This includes ensuring that the base is compacted and level, and that it is free of any voids or water damage.
The most common type of foundation for brick is a concrete block or slab foundation. This type of foundation is typically cheaper and faster to construct than a poured concrete foundation. However, it is not as strong or durable as a poured concrete foundation.
A poured concrete foundation is often used for larger buildings and houses. This type of foundation can withstand a lot of pressure and is usually used for load bearing walls. In order to construct this type of foundation, a trench is dug and the foundation is poured into the ground. This type of foundation is also often used for basements and other types of below-ground structures.
Depending on the type of structure and location, there are many different types of foundations available. For example, a t-shaped foundation is commonly used in colder climates. This type of foundation consists of a t-shaped footing placed in the ground below the frost line, a foundation wall, and a slab between the walls. This type of foundation is more expensive and time consuming than a slab-on-grade foundation, but it offers greater structural integrity and can withstand heavier loads.
When constructing a foundation for brick, it is important to consider the size of the project and the soil conditions. The more extensive the project, the more time and money will be required for preparation and installation. In addition, it is a good idea to consider the use of rebar and concrete for additional support.
Brick is an excellent choice for patios, sidewalks, and other outdoor projects that require a sturdy, attractive foundation. It’s also possible to lay brick over concrete, but it is important to make sure the concrete surface is structurally sound and free of major cracks or unevenness that can interfere with adhesion. If necessary, the concrete should be repaired and covered with coarse sand or gravel to provide a solid base for the brick wall.
Before starting, it’s helpful to dig a trench for the footer of your brick wall. The footer should be the width and depth of your planned brick wall, and it’s important to ensure that it sits below the finished ground level so water cannot pool around the base of the wall, which can cause it to fail.
When the concrete footer is poured, allow it to set for several days before beginning work on the actual brick wall. During this time, it’s also important to prepare the work area by cleaning away any loose dirt and debris that might get in the way of brick adhesion. If necessary, the area should be sprayed down with water to moisten it, and it should also be covered with a tarp or other protective covering to keep it dry.
Once the work area is prepared, mix the mortar. This is a basic combination of five parts sand to one part cement, and it should be stirred until it has a consistency that’s easy to manipulate. If desired, you can add additives to the mortar mix such as colorants or frost-proofer.
Begin laying the first course of bricks, starting with the bottom row. Place a brick on the edge of your foundation and use your guide line to make sure it’s straight and at the correct height. Butter the end of the next brick with a small amount of mortar, and then push it into place against the first brick. Continue laying rows, checking the bricks for alignment and proper height with your guide line and level after each one is laid.
Once you’ve completed the first row, move your guide line up to the 1/2 mortar marker at the start of the second row. This will help you keep the second row even with the first and ensure that all the bricks are at the same height.
Concrete block walls can be finished in a variety of ways, but the most common is to cover them with wood paneling. This process can be expensive, but it gives the wall a clean, stylish appearance that many homeowners find attractive. Another option is to install a brick veneer over the concrete. This method is less expensive, but it may require additional steps to ensure that the bricks adhere properly to the concrete surface.
Before laying any bricks, it is important to make sure that the concrete surface is clean and free of any dirt, oil, or other contaminants that could interfere with the mortar’s adhesion. The surface must also be level and free of any cracks or unevenness that could cause the brick to shift over time.
The next step is to prepare the mortar. This is usually done by mixing it in a wheelbarrow or mortar box. The mix should be roughly three parts masonry sand (or builders sand, if very clean) to one part masonry cement. Water should be added to the mixture to create a consistency that is somewhat thicker than pudding.
Once the mortar is mixed, it can be used to begin laying the bricks. It is generally good practice to build up the ends of a wall first, as this will help to ensure that the final brick structure is straight and level. After the ends are completed, it is a good idea to use a spirit level regularly to check that the rest of the wall remains level and true.
Bricks are typically laid in courses, and the end of each course should be staggered from the previous course. This helps to prevent a “bow” in the brickwork and can be achieved by simply using a piece of string and pins to mark the position of each block.
When the head and bed joints in a course have been built, they should be struck with a tool called a joint striker. The tool is essentially a length of tubing whose diameter is the same as your joint spacing, bent in an “S” shape. You can purchase a joint striker from most brick and construction supply stores, or you can make your own using a piece of copper pipe or a piece of 1/2 inch PVC tube.